.Net MAUIでLabelの文字サイズを自動調整する方法を紹介していきます。
紹介環境
当記事は以下の環境で作成しています。
開発環境
- Visual Studio 2022
- .Net 8
対象プラットフォーム
- Android 8以上
- iOS 15以上
Labelの文字サイズを自動調整する方法
以下の手順で、Labelの文字サイズの自動調整を実装していきます。
手順1:カスタムコントロールを作成します
Labelを継承して文字サイズを自動調整できるカスタムコントロールを作成します。文字サイズの最大値(CustomLabel.MaxFontSize)を設定できるようにしています。
// 名前空間はプロジェクトに合わせてください。
namespace SampleApp.CustomControls;

public class CustomLabel : Label
{
    public static readonly BindableProperty MaxFontSizeProperty =
        BindableProperty.Create(nameof(MaxFontSize), typeof(double), typeof(CustomLabel), 100d);

    /// <summary>
    /// 文字サイズの最大値
    /// </summary>
    public double MaxFontSize
    {
        get => (double)GetValue(MaxFontSizeProperty);
        set => SetValue(MaxFontSizeProperty, value);
    }
}
手順2:【Android】Labelの文字サイズを自動調整します
AndroidでLabelの文字サイズを自動調整するためにハンドラーをカスタマイズしていきます。
文字サイズの自動調整には、TextView.SetAutoSizeTextTypeWithDefaultsを利用します。文字数の変更時に利用するため、Label.Textにマッピングします。
文字サイズの最大値には、TextView.SetAutoSizeTextTypeUniformWithConfigurationを利用します。文字数の変更時 と 文字サイズの最大値の変更時 に利用するため、Label.Text(文字数の変更時) と CustomLabel.MaxFontSize(文字サイズの最大値の変更時) にマッピングします。
文字サイズの最大値は、「最低値 × 2.625px」より小さくするとエラーになります。そのため、最低値を1pxにして最大値に3px以上にしています。
using Microsoft.Maui.Handlers;
using SampleApp.CustomControls;

// 名前空間はプロジェクトに合わせてください。
namespace SampleApp.Platforms.Android.Handlers;

public static class CustomLabelHandler
{
    public static void Initialize()
    {
        LabelHandler.Mapper.AppendToMapping(nameof(Label.Text), (handler, view) =>
        {
            if (view is CustomLabel label)
            {
                label.LineBreakMode = LineBreakMode.NoWrap;
                handler.PlatformView.SetAutoSizeTextTypeWithDefaults(global::Android.Widget.AutoSizeTextType.Uniform);

                SetMaxFontSize(handler, label);
            }
        });

        LabelHandler.Mapper.AppendToMapping(nameof(CustomLabel.MaxFontSize), (handler, view) =>
        {
            if (view is CustomLabel label)
            {
                SetMaxFontSize(handler, label);
            }
        });
    }

    private static void SetMaxFontSize(ILabelHandler handler, CustomLabel label)
    {
        // 最大値を「最低値 × 2.625px」より小さくするとエラーになる。
        // そこで2px以下を指定できないようにする。
        int maxFont = (int)label.MaxFontSize;
        if (maxFont >= 3)
        {
            handler.PlatformView.SetAutoSizeTextTypeUniformWithConfiguration(1, maxFont, 1, 1);
            label.MinimumHeightRequest = maxFont;
        }
    }
}
手順2:【iOS】Labelの文字サイズを自動調整します
iOSでLabelの文字サイズを自動調整するためにハンドラーをカスタマイズしていきます。
文字サイズの自動調整には、UILabel.AdjustsFontSizeToFitWidthを利用します。コントロール作成時に利用するため、Labelに存在しないプロパティにマッピングします。今回はCustomLabelにマッピングしています。
文字サイズの最大値には、Label.FontSizeを利用します。文字サイズの最大値の変更時に利用するため、CustomLabel.MaxFontSizeにマッピングします。
文字サイズの最低値を1pxにするため、UILabel.MinimumScaleFactorに「1f / (nfloat)label.MaxFontSize」を指定しています。
using Microsoft.Maui.Handlers;
using SampleApp.CustomControls;

namespace SampleApp.Platforms.iOS.Handlers;

// 名前空間はプロジェクトに合わせてください。
public static class CustomLabelHandler
{
    public static void Initialize()
    {
        LabelHandler.Mapper.AppendToMapping("CustomLabel", (handler, view) =>
        {
            if (view is CustomLabel label)
            {
                handler.PlatformView.AdjustsFontSizeToFitWidth = true;
                handler.PlatformView.Lines = 1;
            }
        });

        LabelHandler.Mapper.AppendToMapping(nameof(CustomLabel.MaxFontSize), (handler, view) =>
        {
            if (view is CustomLabel label)
            {
                if (label.MaxFontSize >= 3)
                {
                    handler.PlatformView.MinimumScaleFactor = 1f / (nfloat)label.MaxFontSize;
                    label.FontSize = label.MaxFontSize;
                    label.MinimumHeightRequest = label.MaxFontSize;
                }
            }
        });
    }
}
手順3:作成したマッパーを利用します
作成したマッパーを利用するためにApp.CreateWindowでCustomLabelHandler.Initializeを呼び出します。
#if ANDROID

using SampleApp.Platforms.Android.Handlers;

#elif IOS

using SampleApp.Platforms.iOS.Handlers;

#endif

// 名前空間はプロジェクトに合わせてください。
namespace SampleApp
{
    public partial class App : Application
    {
        public App()
        {
            InitializeComponent();
        }

        protected override Window CreateWindow(IActivationState? activationState)
        {
#if ANDROID || IOS
            CustomLabelHandler.Initialize();
#endif
            return new Window(new AppShell());
        }
    }
}
実際に利用してみます
利用例は以下のようになります。11行目は、CustomLabel.MaxFontSizeを指定しています。
<?xml version="1.0" encoding="utf-8" ?>
<ContentPage
    xmlns="http://schemas.microsoft.com/dotnet/2021/maui"
    xmlns:x="http://schemas.microsoft.com/winfx/2009/xaml"
    xmlns:control="clr-namespace:SampleApp.CustomControls"
    x:Class="SampleApp.MainPage">

    <VerticalStackLayout>
        <control:CustomLabel Text="サンプル" />
        <control:CustomLabel Text="サンプルテキスト サンプルテキスト" />
        <control:CustomLabel Text="サンプルテキスト サンプルテキスト" MaxFontSize="20" />
    </VerticalStackLayout>
</ContentPage>
動作イメージ
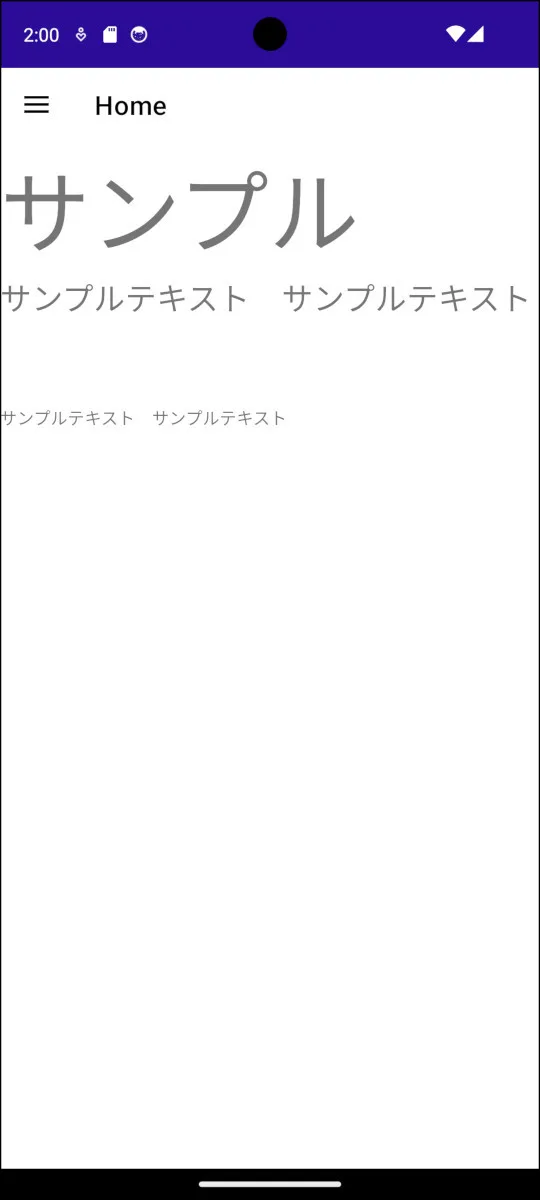
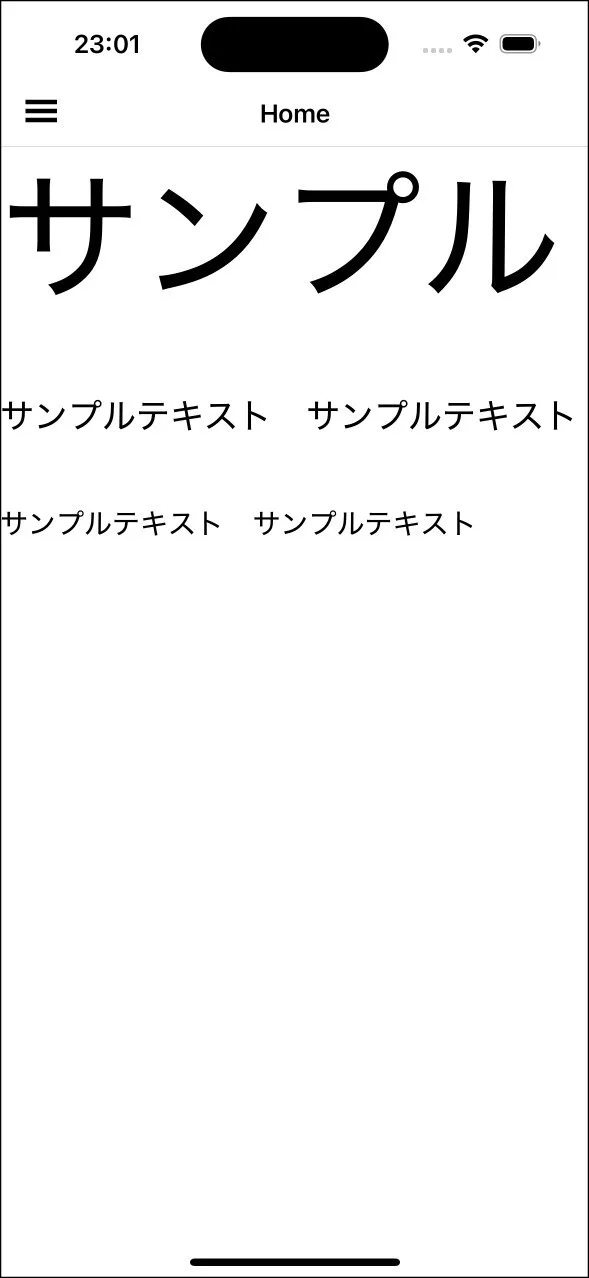
Android・iOSの動作イメージは、以下のようになります。


終わりに
Labelの文字サイズの自動調整を実装してみました。初回だけ適用すれば実装できると考えていましたが、Androidはテキストの変更時に適用する必要があり驚きました。当たり前ですがプラットフォームごとに癖があるようです。
