.Net MAUIで二次元バーコードの読み取り方を紹介します。
当記事では、BarcodeScanning.Native.Mauiというライブラリを利用します。
紹介環境
当記事は以下の環境で作成しています。
開発環境
- Visual Studio 2022
- .Net 9
BarcodeScanning.Native.Mauiとは?
BarcodeScanning.Native.Mauiは、使用感がZxing.Net.MAUIに近いライブラリになっています。
バーコードの読み取りには、以下のライブラリが利用されています。
BarcodeScanning.Native.Mauiの詳細は、以下を参照してください。
二次元バーコードの読み取る方法について
二次元バーコードの読み取る方法は、以下のようになります。
手順1:BarcodeScanning.Native.Mauiをインストールします
BarcodeScanning.Native.MauiのパッケージをNuGetからインストールします。
NuGetからパッケージをインストールする手順は以下の通りです。
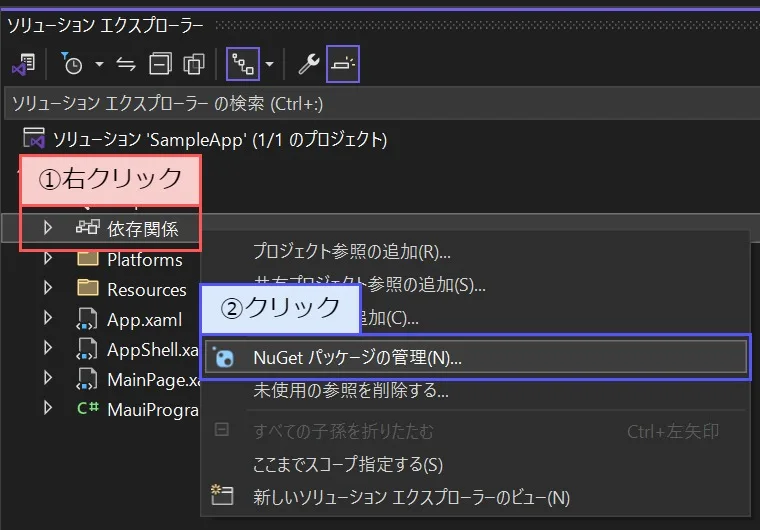
手順A:ソリューション エクスプローラーの「依存関係」を右クリックし、メニューから「NuGet パッケージの管理(N)」をクリックします。

手順B:NuGet パッケージ マネージャーの検索欄に「BarcodeScanning.Native.Maui」と入力し、以下のようにインストールします。※この手順は参照タブで行います。

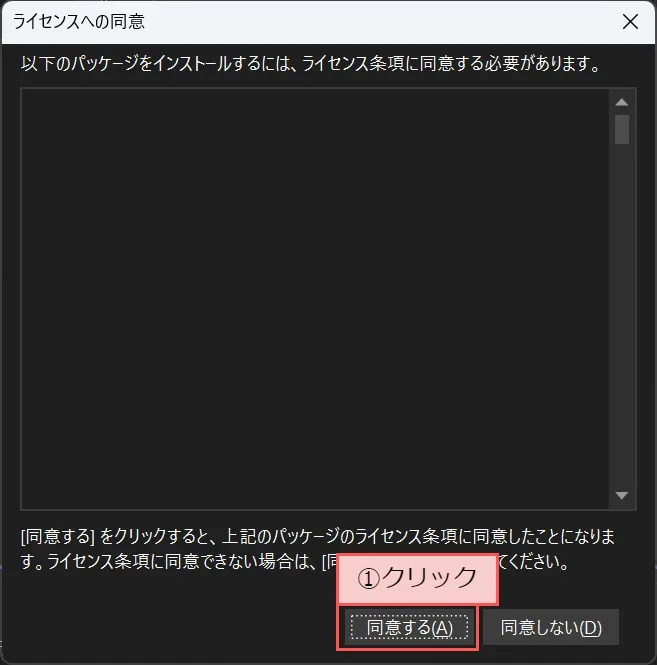
手順C:ライセンスの同意が表示されますので「同意する(A)」をクリックします。これでパッケージのインストールは完了します。

手順2:UseBarcodeScanningを呼び出します
MauiProgram.CreateMauiAppでbuilder.UseBarcodeScanningを配置します。
using BarcodeScanning;

// 名前空間はプロジェクトに合わせてください。
namespace SampleApp;

public static class MauiProgram
{
    public static MauiApp CreateMauiApp()
    {
        var builder = MauiApp.CreateBuilder();
        builder.UseMauiApp<App>();
        builder.UseBarcodeScanning();
        return builder.Build();
    }
}
手順3:【Android】権限を追加します
二次元バーコードの読み取りにはカメラを利用します。そのため、以下のようにカメラ権限を追加します。
using Android.App;

[assembly: UsesPermission(Android.Manifest.Permission.Camera)]

// 名前空間はプロジェクトに合わせてください。
namespace SampleApp;

[Activity(
    Theme = "@style/Maui.SplashTheme",
    MainLauncher = true)]
public class MainActivity : MauiAppCompatActivity
{
}
手順3:【iOS】権限を追加します
二次元バーコードの読み取りにはカメラを利用します。そのため、以下のようにカメラ権限を追加します。

手順4:コントロールを呼び出します
二次元バーコードの読み取りにはCameraViewを利用します。
CameraViewは、以下のように呼び出します。
<?xml version="1.0" encoding="utf-8" ?>
<ContentPage
    xmlns="http://schemas.microsoft.com/dotnet/2021/maui"
    xmlns:x="http://schemas.microsoft.com/winfx/2009/xaml"
    xmlns:scanner="clr-namespace:BarcodeScanning;assembly=BarcodeScanning.Native.Maui"
    x:Class="SampleApp.MainPage">
    <Grid RowDefinitions="*,30">
        <scanner:CameraView />
        <Label Grid.Row="1" x:Name="lblBarcode" />
    </Grid>
</ContentPage>
手順5:カメラ権限を許可できるようにします
カメラ権限を許可できるようにします。
以下は、カメラ権限の許可を画面表示時に確認しています。カメラ権限が許可されない場合、メッセージボックスが表示されます。
<?xml version="1.0" encoding="utf-8" ?>
<ContentPage
    xmlns="http://schemas.microsoft.com/dotnet/2021/maui"
    xmlns:x="http://schemas.microsoft.com/winfx/2009/xaml"
    xmlns:scanner="clr-namespace:BarcodeScanning;assembly=BarcodeScanning.Native.Maui"
    x:Class="SampleApp.MainPage"
    Loaded="ContentPage_Loaded">
    <Grid RowDefinitions="*,30">
        <scanner:CameraView />
        <Label Grid.Row="1" x:Name="lblBarcode" />
    </Grid>
</ContentPage>
// 名前空間はプロジェクトに合わせてください。
namespace SampleApp;
public partial class MainPage : ContentPage
{
public MainPage()
{
InitializeComponent();
}
private async void ContentPage_Loaded(object sender, EventArgs e)
{
if (!await IsGrantedCameraPermissionAsync())
{
await DisplayAlert("警告", "カメラ権限がありません。", "OK");
return;
}
}
private async Task<bool> IsGrantedCameraPermissionAsync()
{
PermissionStatus status = await Permissions.CheckStatusAsync<Permissions.Camera>();
if (status == PermissionStatus.Granted) return true;
if (status == PermissionStatus.Denied && DeviceInfo.Platform == DevicePlatform.iOS)
{
return false;
}
status = await Permissions.RequestAsync<Permissions.Camera>();
return status == PermissionStatus.Granted;
}
}手順6:二次元バーコードの読み取りを追加します
二次元バーコードの読み取るために、以下のようにコントロールを修正します。CameraView.CameraEnabled=”True”は、カメラを有効にします。CameraView.OnDetectionFinishedは、二次元バーコードの読み取り時イベントになります。
<?xml version="1.0" encoding="utf-8" ?>
<ContentPage
    xmlns="http://schemas.microsoft.com/dotnet/2021/maui"
    xmlns:x="http://schemas.microsoft.com/winfx/2009/xaml"
    xmlns:scanner="clr-namespace:BarcodeScanning;assembly=BarcodeScanning.Native.Maui"
    x:Class="SampleApp.MainPage"
    Loaded="ContentPage_Loaded">
    <Grid RowDefinitions="*,30">
        <scanner:CameraView
            CameraEnabled="True"
            OnDetectionFinished="CameraView_OnDetectionFinished" />
        <Label Grid.Row="1" x:Name="lblBarcode" />
    </Grid>
</ContentPage>
読み取れた二次元バーコードは、以下のように取得します。
// 名前空間はプロジェクトに合わせてください。
namespace SampleApp;

public partial class MainPage : ContentPage
{
    public MainPage()
    {
        InitializeComponent();
    }

    private async void ContentPage_Loaded(object sender, EventArgs e)
    {
        if (!await IsGrantedCameraPermissionAsync())
        {
            await DisplayAlert("警告", "カメラ権限がありません。", "OK");
            return;
        }
    }

    private void CameraView_OnDetectionFinished(object sender, BarcodeScanning.OnDetectionFinishedEventArg e)
    {
        if (e.BarcodeResults.Count > 0)
        {
            lblBarcode.Text = e.BarcodeResults.First().DisplayValue;
        }
    }

    private async Task<bool> IsGrantedCameraPermissionAsync()
    {
        PermissionStatus status = await Permissions.CheckStatusAsync<Permissions.Camera>();

        if (status == PermissionStatus.Granted) return true;

        if (status == PermissionStatus.Denied && DeviceInfo.Platform == DevicePlatform.iOS)
        {
            return false;
        }

        status = await Permissions.RequestAsync<Permissions.Camera>();
        return status == PermissionStatus.Granted;
    }
}
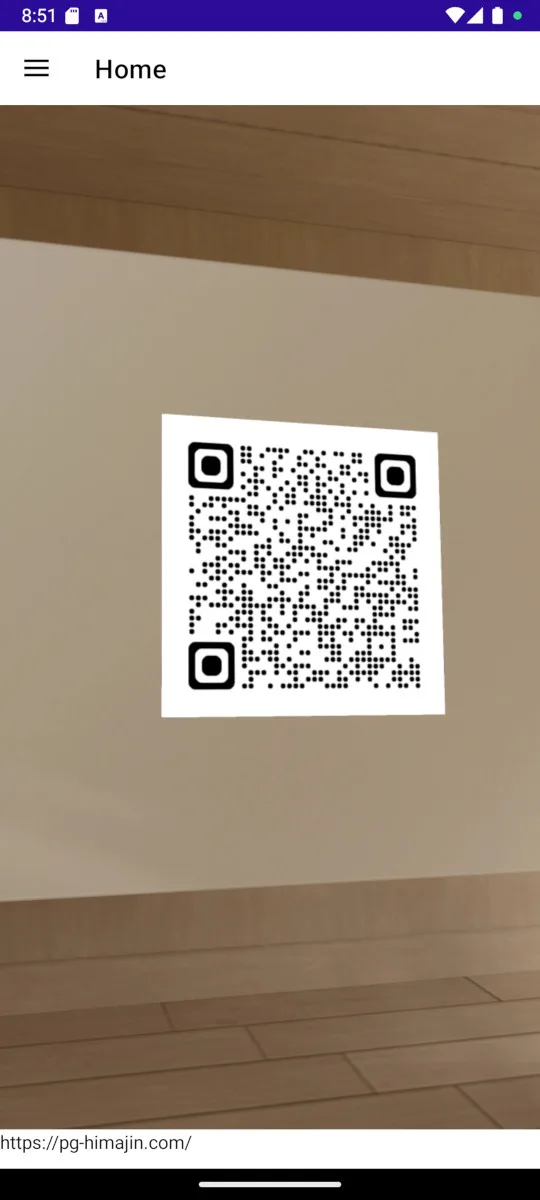
動作イメージ
動作イメージは、以下のようになります。

ViewModelで二次元バーコードの読み取る場合
ViewModelに実装するには、CameraView.OnDetectionFinishedCommandを利用します。
実装例は、以下のようになります。
<?xml version="1.0" encoding="utf-8" ?>
<ContentPage
    xmlns="http://schemas.microsoft.com/dotnet/2021/maui"
    xmlns:x="http://schemas.microsoft.com/winfx/2009/xaml"
    xmlns:scanner="clr-namespace:BarcodeScanning;assembly=BarcodeScanning.Native.Maui"
    xmlns:vm="clr-namespace:SampleApp.ViewModels"
    x:Class="SampleApp.MainPage"
    Loaded="ContentPage_Loaded">
    <ContentPage.BindingContext>
        <vm:MainPageViewModel />
    </ContentPage.BindingContext>
    <Grid RowDefinitions="*,30">
        <scanner:CameraView
            CameraEnabled="True"
            OnDetectionFinishedCommand="{Binding DetectionFinishedCommand}" />
        <Label Grid.Row="1" Text="{Binding BarcodeText}" />
    </Grid>
</ContentPage>
using BarcodeScanning;
using System.ComponentModel;
using System.Runtime.CompilerServices;
using System.Windows.Input;
// 名前空間はプロジェクトに合わせてください。
namespace SampleApp.ViewModels;
public class MainPageViewModel : INotifyPropertyChanged
{
private string? _barcodeText = null;
public MainPageViewModel()
{
DetectionFinishedCommand = new Command<IReadOnlySet<BarcodeResult>>(result =>
{
if (result.Count > 0)
{
BarcodeText = result.First().DisplayValue;
}
});
}
public event PropertyChangedEventHandler? PropertyChanged;
public string? BarcodeText
{
get => _barcodeText;
set => OnPropertyChanged(value, ref _barcodeText);
}
public ICommand DetectionFinishedCommand { get; set; }
public void OnPropertyChanged<T>(T value, ref T refValue, [CallerMemberName] string name = "")
{
refValue = value;
PropertyChanged?.Invoke(this, new PropertyChangedEventArgs(name));
}
}終わりに
二次元バーコードの読み込みには、Zxing.Net.MAUIを利用していました。しかし、Zxing.Net.MAUIでは色々問題があり、BarcodeScanning.Native.Mauiへ乗り換えました。この記事が役に立てば幸いです。
Zxing.Net.MAUIについて、以下で紹介しています。よければ参考にしてみてください。
