
.NET MAUI ShellのTabをAndroid・iOSで均等に配置する方法を紹介します。
当記事は実装方法を紹介してから実際に利用してみた例を紹介しています。
紹介環境
当記事は以下の環境で作成しています。
- Visual Studio 2022
- .Net 8
- Android 14
- iOS 17.0
.NET MAUI ShellのTabについて
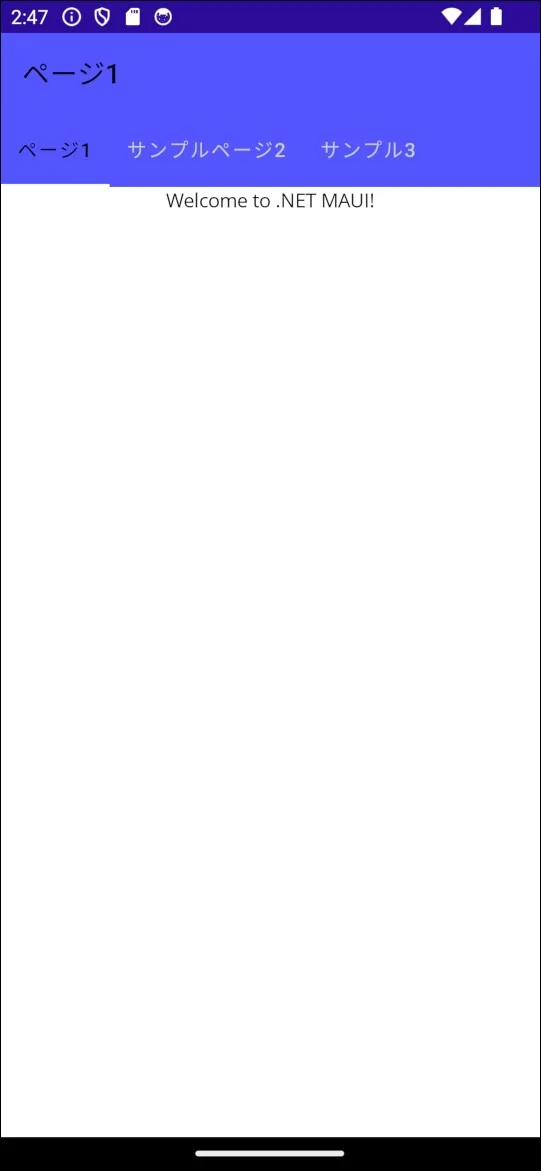
.NET MAUI ShellのTabは、以下のようにタブが左側に寄ります。また、タブの幅は文字数に合わせて変動します。
実装方法(共通部分)
共通部分の実装方法を説明します。
ファイル構成について
以下のようにクラスファイルを用意します。
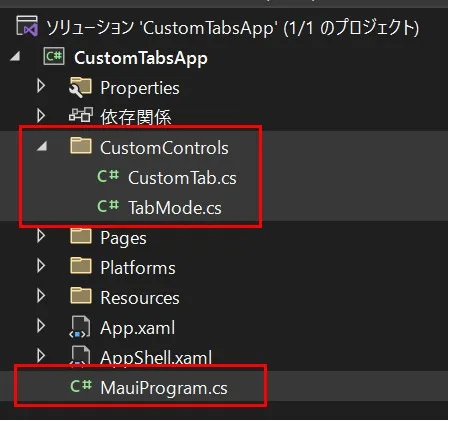
各ファイルの内容について
Tabを以下のようにカスタムします。TabModeはタブの状態を 通常 か 均等 のどちらかを選べるようにしています。
// 名前空間はプロジェクトに合わせてください。
namespace CustomTabsApp.CustomControls;

public class CustomTab : Tab
{
    public TabMode TabMode
    {
        get => (TabMode)GetValue(TabModeProperty);
        set => SetValue(TabModeProperty, value);
    }

    public static readonly BindableProperty TabModeProperty =
        BindableProperty.Create(nameof(TabMode),
                                typeof(TabMode),
                                typeof(CustomTab),
                                TabMode.Normal,
                                BindingMode.OneTime);
}
// 名前空間はプロジェクトに合わせてください。
namespace CustomTabsApp.CustomControls;
/// <summary>
/// タブの配置を定義します。
/// </summary>
public enum TabMode
{
/// <summary>
/// 通常
/// </summary>
Normal,
/// <summary>
/// 均等
/// </summary>
Equivalent
}Shellの動作を変更するためにカスタムレンダラーを利用します。カスタムレンダラーを動作させるためにMauiProgramに対して以下の内容を記載します。CustomShellRendererの内容は後で紹介します。
/* 追加します。======== */
#if ANDROID

using CustomTabsApp.Platforms.Android.Renderers.CustomShell;

#elif IOS

using CustomTabsApp.Platforms.iOS.Renderers.CustomShell;

#endif
/* ==================== */

using Microsoft.Extensions.Logging;

// 名前空間はプロジェクトに合わせてください。
namespace CustomTabsApp;

public static class MauiProgram
{
    public static MauiApp CreateMauiApp()
    {
        var builder = MauiApp.CreateBuilder();
        builder
            .UseMauiApp<App>()
            .ConfigureFonts(fonts =>
            {
                fonts.AddFont("OpenSans-Regular.ttf", "OpenSansRegular");
                fonts.AddFont("OpenSans-Semibold.ttf", "OpenSansSemibold");
            })
        /* 追加します。======== */
            .ConfigureMauiHandlers((handlers) =>
            {
#if ANDROID || IOS
                handlers.AddHandler(typeof(Shell), typeof(CustomShellRenderer));
#endif
            });
        /* ==================== */

#if DEBUG
        builder.Logging.AddDebug();
#endif

        return builder.Build();
    }
}
実装方法(Android編)
Android部分の実装方法を説明します。
ファイル構成について
以下のようにクラスファイルを用意します。

各ファイルの内容について
Androidの場合、Tab(.NET MAUI Shell)のカスタムレンダラーは以下のようになります。Tab(.NET MAUI Shell)にはTabLayoutが利用されているようです。
using Microsoft.Maui.Controls.Handlers.Compatibility;
using Microsoft.Maui.Controls.Platform.Compatibility;

// 名前空間はプロジェクトに合わせてください。
namespace CustomTabsApp.Platforms.Android.Renderers.CustomShell;

internal class CustomShellRenderer : ShellRenderer
{
    protected override IShellTabLayoutAppearanceTracker CreateTabLayoutAppearanceTracker(ShellSection shellSection)
    {
        return new CustomShellTabLayoutAppearanceTracker(shellSection, this);
    }
}
以下の方法でタブを均等にしています。タブの均等は「TabLayout.ModeFixed」と「TabLayout.GravityFill」を利用しています。
using CustomTabsApp.CustomControls;
using Google.Android.Material.Tabs;
using Microsoft.Maui.Controls.Platform.Compatibility;

// 名前空間はプロジェクトに合わせてください。
namespace CustomTabsApp.Platforms.Android.Renderers.CustomShell;

internal class CustomShellTabLayoutAppearanceTracker : ShellTabLayoutAppearanceTracker
{
    private readonly ShellSection _shellSection;

    public CustomShellTabLayoutAppearanceTracker(ShellSection shellSection, IShellContext shellContext) : base(shellContext)
    {
        _shellSection = shellSection;
    }

    public override void SetAppearance(TabLayout tabLayout, ShellAppearance appearance)
    {
        base.SetAppearance(tabLayout, appearance);
        if (_shellSection is CustomTab customTab &&
            customTab.TabMode == TabMode.Equivalent)
        {
            // タブを全て同じ大きさにします。大きさは最大サイズに合わせます。
            tabLayout.TabMode = TabLayout.ModeFixed;
            // 画面いっぱいにタブを広げます。
            tabLayout.TabGravity = TabLayout.GravityFill;
        }
    }
}
「TabLayout.ModeFixed」と「TabLayout.GravityFill」でのタブの均等は幅600dpまでになりますが、以下のように「tabMaxWidth」を0dpにすることで幅関係なくタブを均等にすることができます。
<?xml version="1.0" encoding="utf-8"?>
<resources>
<style name="Base.Widget.Design.TabLayout" parent="android:Widget">
<item name="tabMaxWidth">0dp</item>
</style>
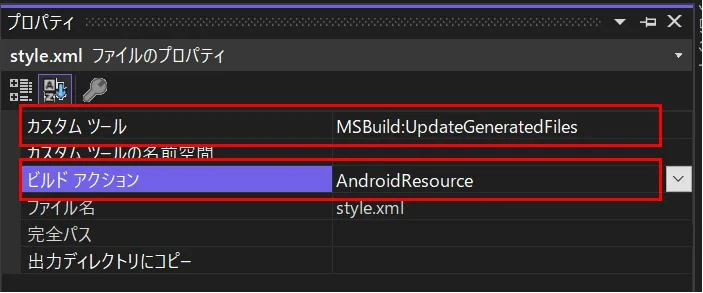
</resources>style.xmlが認識されないとき
「style.xml」が認識されないときがあります。そんな時は「style.xml」のプロパティからビルドアクションをAndroidResourceに変更する必要があります。
実装方法(iOS編)
iOS部分の実装方法を説明します。
ファイル構成について
以下のようにクラスファイルを用意します。
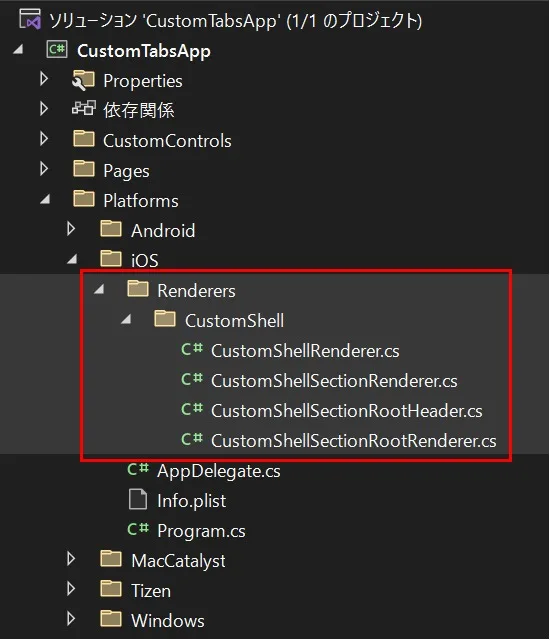
各ファイルの内容について
iOSの場合、Tab(.NET MAUI Shell)のカスタムレンダラーは以下のようになります。Androidより複雑になっています。
using Microsoft.Maui.Controls.Handlers.Compatibility;
using Microsoft.Maui.Controls.Platform.Compatibility;

// 名前空間はプロジェクトに合わせてください。
namespace CustomTabsApp.Platforms.iOS.Renderers.CustomShell;

internal class CustomShellRenderer : ShellRenderer
{
    protected override IShellSectionRenderer CreateShellSectionRenderer(ShellSection shellSection)
    {
        return new CustomShellSectionRenderer(this);
    }
}
using Microsoft.Maui.Controls.Platform.Compatibility;
// 名前空間はプロジェクトに合わせてください。
namespace CustomTabsApp.Platforms.iOS.Renderers.CustomShell;
internal class CustomShellSectionRenderer : ShellSectionRenderer
{
public CustomShellSectionRenderer(IShellContext context) : base(context)
{
}
protected override IShellSectionRootRenderer CreateShellSectionRootRenderer(ShellSection shellSection, IShellContext shellContext)
{
return new CustomShellSectionRootRenderer(shellSection, shellContext);
}
}画面が回転されると画面の幅が変わるため「ViewWillTransitionToSize」でタブの幅を再設定しています。
using CoreGraphics;
using Microsoft.Maui.Controls.Platform.Compatibility;
using UIKit;

// 名前空間はプロジェクトに合わせてください。
namespace CustomTabsApp.Platforms.iOS.Renderers.CustomShell;

internal class CustomShellSectionRootRenderer : ShellSectionRootRenderer
{
    private CustomShellSectionRootHeader? _customShellSectionRootHeader;
    public CustomShellSectionRootRenderer(ShellSection shellSection, IShellContext shellContext) : base(shellSection, shellContext)
    {
    }

    protected override IShellSectionRootHeader CreateShellSectionRootHeader(IShellContext shellContext)
    {
        _customShellSectionRootHeader = new CustomShellSectionRootHeader(shellContext);
        return _customShellSectionRootHeader;
    }

    /// <summary>
    /// 画面回転時
    /// </summary>
    /// <param name="toSize"></param>
    /// <param name="coordinator"></param>
    public override void ViewWillTransitionToSize(CGSize toSize, IUIViewControllerTransitionCoordinator coordinator)
    {
        base.ViewWillTransitionToSize(toSize, coordinator);
        // タブの幅を再設定します。
        _customShellSectionRootHeader?.SetLayout(toSize.Width);
    }
}
以下の方法でタブを均等にしています。
タブの幅は「width.Value(画面の幅) / ShellSection.Items.Count(タブの個数)」で指定しています。また、タブのマージは「MinimumInteritemSpacing」で0にしています。
using CoreGraphics;
using CustomTabsApp.CustomControls;
using Microsoft.Maui.Controls.Platform.Compatibility;
using System.Runtime.InteropServices;
using UIKit;

// 名前空間はプロジェクトに合わせてください。
namespace CustomTabsApp.Platforms.iOS.Renderers.CustomShell;

internal class CustomShellSectionRootHeader : ShellSectionRootHeader
{
    private UICollectionViewFlowLayout? _layout;

    public CustomShellSectionRootHeader(IShellContext shellContext) : base(shellContext)
    {
    }

    public override void ViewDidLoad()
    {
        base.ViewDidLoad();
        SetLayout(CollectionView.Frame.Width);
    }

    /// <summary>
    /// レイアウトを設定します。
    /// </summary>
    /// <param name="width">画面の幅</param>
    public void SetLayout(NFloat width)
    {
        if (ShellSection is not CustomTab customTab) return;
        if (customTab.TabMode != TabMode.Equivalent) return;
        if (_layout == null)
        {
            _layout = new()
            {
                // マージを0にします。
                MinimumInteritemSpacing = 0,
            };
            CollectionView.CollectionViewLayout = _layout;
        }
        _layout.ItemSize = new CGSize(
            // 画面の幅 / タブの個数
            width.Value / ShellSection.Items.Count,
            // タブの高さ
            35);
    }
}
実際に利用してみた例
実際に利用してみた例は以下のようになります。
<?xml version="1.0" encoding="UTF-8" ?>
<Shell
x:Class="CustomTabsApp.AppShell"
xmlns="http://schemas.microsoft.com/dotnet/2021/maui"
xmlns:x="http://schemas.microsoft.com/winfx/2009/xaml"
xmlns:pages="clr-namespace:CustomTabsApp.Pages"
xmlns:control="clr-namespace:CustomTabsApp.CustomControls"
Shell.FlyoutBehavior="Disabled"
BackgroundColor="#5555FF"
Title="CustomTabsApp">
<control:CustomTab
TabMode="Equivalent">
<ShellContent
Title="ページ1"
ContentTemplate="{DataTemplate pages:SamplePage1}"></ShellContent>
<ShellContent
Title="サンプルページ2"
ContentTemplate="{DataTemplate pages:SamplePage2}"></ShellContent>
<ShellContent
Title="サンプル3"
ContentTemplate="{DataTemplate pages:SamplePage3}"></ShellContent>
</control:CustomTab>
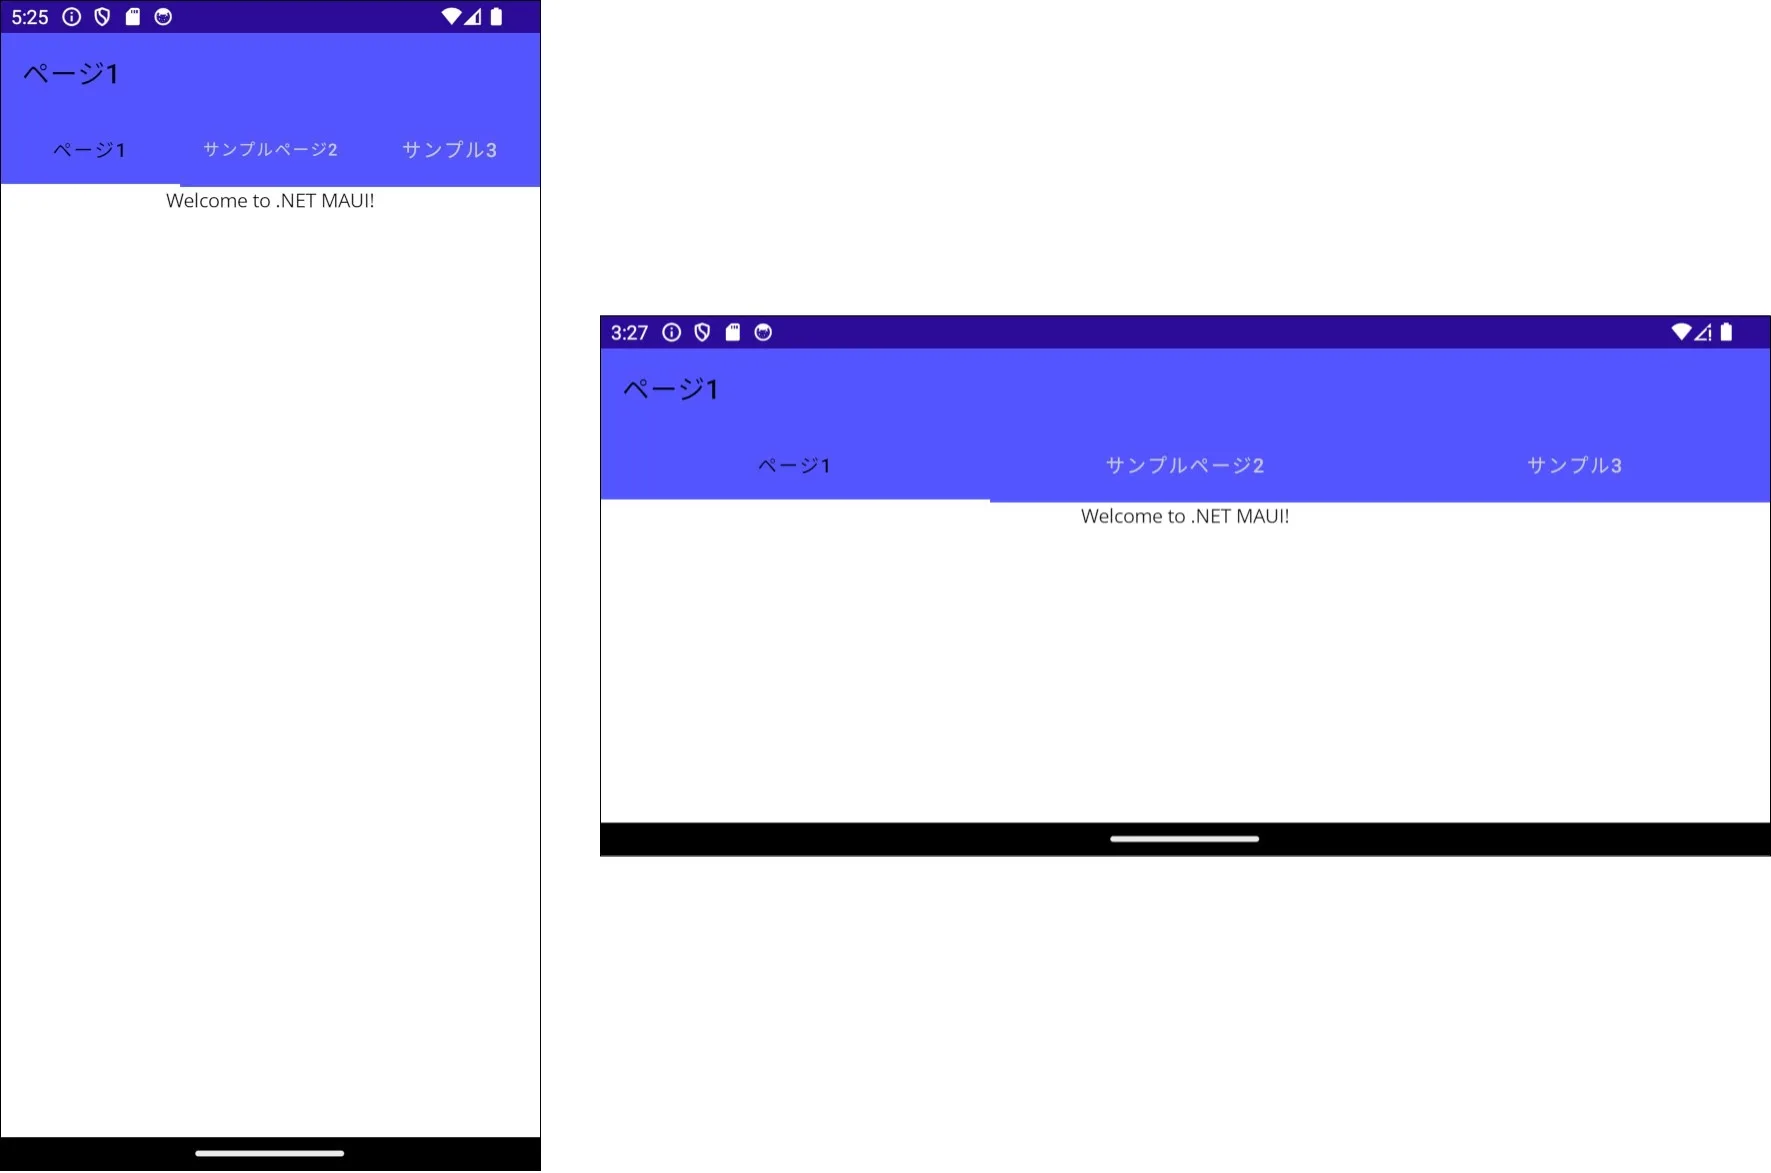
</Shell>動作イメージ(Android)
Androidの動作イメージは以下のようになります。
動作イメージ(iOS)
iOSの動作イメージは以下のようになります。

おわりに
.NET MAUI ShellのTabを均等にする方法を紹介していきました。最初、タブを均等にすることは出来ましたが、回転時してもタブの均等を保つことは困難でした。
タブを均等にすることはよくあると思いますので、当記事の内容が役に立てば幸いです。