Androidの場合、.NET MAUI ShellのTabは指をスライドさせることで画面遷移することができます。しかし、iOSでは指をスライドさせても画面遷移することができません。
当記事ではiOSでもスワイプして画面遷移する方法を紹介していきます。
紹介環境
当記事は以下の環境で作成しています。
- Visual Studio 2022
- .Net 8
- Android 14
- iOS 17.2
Tabについて
Tabは以下のように記載することで上部のタブ表示が行えます。
<?xml version="1.0" encoding="UTF-8" ?>
<Shell
    x:Class="SwipeTabsApp.AppShell"
    xmlns="http://schemas.microsoft.com/dotnet/2021/maui"
    xmlns:x="http://schemas.microsoft.com/winfx/2009/xaml"
    xmlns:pages="clr-namespace:SwipeTabsApp.Pages"
    Shell.FlyoutBehavior="Disabled"
    Title="SwipeTabsApp">
    <Tab>
        <ShellContent Title="ページ1" ContentTemplate="{DataTemplate pages:SamplePage1}"/>
        <ShellContent Title="ページ2" ContentTemplate="{DataTemplate pages:SamplePage2}"/>
        <ShellContent Title="ページ3" ContentTemplate="{DataTemplate pages:SamplePage3}"/>
    </Tab>
</Shell>
詳細は以下で紹介しています。良ければ参考にしてみてください。
Androidの動作について
Androidの場合、.NET MAUI ShellのTabは以下のように指をスライドして隣の画面に遷移することができます。
実装方法
実装方法を説明します。
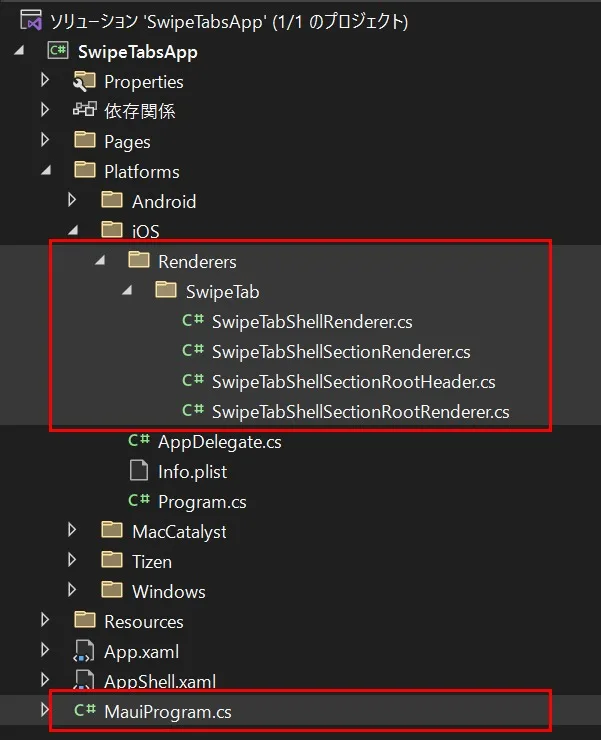
手順1:ファイルを準備します
以下のようにファイルを準備します。
手順2:ハンドラーをカスタムします
Shellのハンドラーをカスタムしていきます。
ShellRendererクラスをカスタムします
ShellのiOSのハンドラーはShellRendererクラスになります。そのShellRendererクラスをカスタムするために継承していきます。実装した内容は以下のようになります。
using Microsoft.Maui.Controls.Handlers.Compatibility;
using Microsoft.Maui.Controls.Platform.Compatibility;

namespace SwipeTabsApp.Platforms.iOS.Renderers.SwipeTab;

public class SwipeTabShellRenderer : ShellRenderer
{
    protected override IShellSectionRenderer CreateShellSectionRenderer(ShellSection shellSection)
    {
        return new SwipeTabShellSectionRenderer(this);
    }
}ShellContentをカスタムするためにCreateShellSectionRendererメソッドを利用していきます。
ShellSectionRendererクラスをカスタムします
CreateShellSectionRendererメソッドで返却しているSwipeTabShellSectionRendererクラスを作成していきます。
using Microsoft.Maui.Controls.Platform.Compatibility;

namespace SwipeTabsApp.Platforms.iOS.Renderers.SwipeTab;

public class SwipeTabShellSectionRenderer : ShellSectionRenderer
{
    public SwipeTabShellSectionRenderer(IShellContext context) : base(context)
    {
    }

    protected override IShellSectionRootRenderer CreateShellSectionRootRenderer(ShellSection shellSection, IShellContext shellContext)
    {
        return new SwipeTabShellSectionRootRenderer(shellSection, shellContext);
    }
}TabをカスタムするためにCreateShellSectionRootRendererメソッドを利用していきます。
ShellSectionRootRendererクラスをカスタムします
SwipeTabShellSectionRootRendererクラスではスワイプ時のイベントを宣言していきます。
using Microsoft.Maui.Controls.Platform.Compatibility;
using UIKit;

namespace SwipeTabsApp.Platforms.iOS.Renderers.SwipeTab;

public class SwipeTabShellSectionRootRenderer : ShellSectionRootRenderer
{
    private SwipeTabShellSectionRootHeader? _swipeTabShellSectionRootHeader;
    private ShellSection _shellSection;

    public SwipeTabShellSectionRootRenderer(ShellSection shellSection, IShellContext shellContext) : base(shellSection, shellContext)
    {
        _shellSection = shellSection;
    }

    protected override IShellSectionRootHeader CreateShellSectionRootHeader(IShellContext shellContext)
    {
        _swipeTabShellSectionRootHeader = new SwipeTabShellSectionRootHeader(shellContext);
        return _swipeTabShellSectionRootHeader;
    }

    public override void ViewDidLoad()
    {
        base.ViewDidLoad();

        if (View == null) return;
        if (_shellSection is not Tab) return;
        if (_swipeTabShellSectionRootHeader == null) return;

        // 左にスワイプ時
        UISwipeGestureRecognizer swipeL = new()
        {
            Direction = UISwipeGestureRecognizerDirection.Left
        };
        swipeL.AddTarget(() =>
        {
            // 右の画面に遷移
            _swipeTabShellSectionRootHeader.MoveTab((int)_swipeTabShellSectionRootHeader.SelectedIndex + 1);
        });
        View.AddGestureRecognizer(swipeL);

        // 右にスワイプ時
        UISwipeGestureRecognizer swipeR = new()
        {
            Direction = UISwipeGestureRecognizerDirection.Right
        };
        swipeR.AddTarget(() =>
        {
            // 左の画面に遷移
            _swipeTabShellSectionRootHeader.MoveTab((int)_swipeTabShellSectionRootHeader.SelectedIndex - 1);
        });
        View.AddGestureRecognizer(swipeR);
    }
}
ShellSectionRootHeaderクラスをカスタムします
SwipeTabShellSectionRootHeaderクラスのMoveTabメソッドを用意していきます。MoveTabメソッドでは指定された画面へ遷移できるようにします。
using Microsoft.Maui.Controls.Platform.Compatibility;
using System.Collections.ObjectModel;

namespace SwipeTabsApp.Platforms.iOS.Renderers.SwipeTab;

public class SwipeTabShellSectionRootHeader : ShellSectionRootHeader
{
    public SwipeTabShellSectionRootHeader(IShellContext shellContext) : base(shellContext)
    {
    }

    /// <summary>
    /// 指定された画面へ遷移します。
    /// </summary>
    /// <param name="index"></param>
    public void MoveTab(int index)
    {
        ReadOnlyCollection<ShellContent> shellContents = ((IShellSectionController)ShellSection).GetItems();

        // 指定された画面が存在するか判定します。
        if (index < 0 || shellContents.Count <= index) return;

        // 指定された画面へ遷移します。
        ShellContent shellContent = shellContents[index];
        ShellSection.SetValueFromRenderer(ShellSection.CurrentItemProperty, shellContent);
    }
}
手順3:カスタムしたハンドラーを登録します
カスタムしたハンドラー(SwipeTabShellRenderer)を登録するために、MauiProgramクラスに以下のように実装していきます。
using Microsoft.Extensions.Logging;

#if IOS
using SwipeTabsApp.Platforms.iOS.Renderers.SwipeTab;
#endif

namespace SwipeTabsApp;

public static class MauiProgram
{
    public static MauiApp CreateMauiApp()
    {
        var builder = MauiApp.CreateBuilder();
        builder
            .UseMauiApp<App>()
            .ConfigureFonts(fonts =>
            {
                fonts.AddFont("OpenSans-Regular.ttf", "OpenSansRegular");
                fonts.AddFont("OpenSans-Semibold.ttf", "OpenSansSemibold");
            })
        /* 追加します。======== */
            .ConfigureMauiHandlers((handlers) =>
            {
#if IOS
                handlers.AddHandler(typeof(Shell), typeof(SwipeTabShellRenderer));
#endif
            });
        /* ==================== */

#if DEBUG
        builder.Logging.AddDebug();
#endif

        return builder.Build();
    }
}
動作イメージ
動作イメージは以下のようになります。
おわりに
iOSでも.NET MAUI ShellのTabでスワイプすることで画面遷移する方法を紹介してきました。Androidでは最初からできていますが、iOSではできなかったので実装方法を考えてみました。当記事の内容が役に立てば幸いです。