.NET MAUI ShellのTabBarをカスタマイズして選択されたタブの背景色と選択されていないタブのタイトルの色の変更方法を紹介していきます。
当記事ではAndroid・iOSの内容になります。
紹介環境
当記事は以下の環境で作成しています。
- Visual Studio 2022
- .Net 8
- Android 14
- iOS 17.5
TabBarについて
TabBarは以下のように記載することでタブ表示が行えます。
<?xml version="1.0" encoding="UTF-8" ?>
<Shell
    x:Class="SampleApp.AppShell"
    xmlns="http://schemas.microsoft.com/dotnet/2021/maui"
    xmlns:x="http://schemas.microsoft.com/winfx/2009/xaml"
    xmlns:pages="clr-namespace:SampleApp.Pages"
    Shell.FlyoutBehavior="Disabled"
    Title="SampleApp">
    <TabBar>
        <ShellContent Title="サンプル1" ContentTemplate="{DataTemplate pages:SamplePage1}" />
        <ShellContent Title="サンプル2" ContentTemplate="{DataTemplate pages:SamplePage2}" />
        <ShellContent Title="サンプル3" ContentTemplate="{DataTemplate pages:SamplePage3}" />
    </TabBar>
</Shell>
詳細は以下で紹介しています。良ければ参考にしてみてください。
実装方法(共通部分)
共通部分の実装方法を説明します。※ハンドラーの登録は後で紹介します。
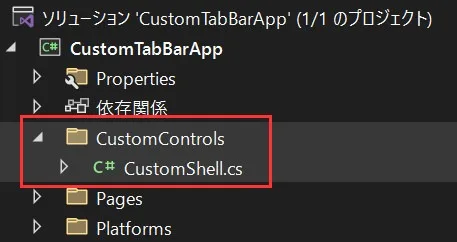
手順1:ファイルを準備します
以下のようにファイルを準備します。
手順2:プロパティを用意します
選択されたタブの背景色と選択されていないタブのタイトルの色のプロパティを以下のように用意します。
// 名前空間はソースに合わせてください。
namespace CustomTabBarApp.CustomControls;

public class CustomShell
{
    /// <summary>
    /// 選択されたタブの背景色
    /// </summary>
    public static readonly BindableProperty TabBarSelectedBackgroundColorProperty =
        BindableProperty.CreateAttached("TabBarSelectedBackgroundColor", typeof(Color), typeof(CustomShell), null);

    /// <summary>
    /// 選択されたタブの背景色を取得します。
    /// </summary>
    public static Color GetTabBarSelectedBackgroundColor(BindableObject obj) => (Color)obj.GetValue(TabBarSelectedBackgroundColorProperty);

    /// <summary>
    /// 選択されたタブの背景色を設定します。
    /// </summary>
    public static void SetTabBarSelectedBackgroundColor(BindableObject obj, Color value) => obj.SetValue(TabBarSelectedBackgroundColorProperty, value);

    /// <summary>
    /// 選択されていないタブのタイトルの色
    /// </summary>
    public static readonly BindableProperty TabBarUnselectedTitleColorProperty =
        BindableProperty.CreateAttached("TabBarUnselectedTitleColor", typeof(Color), typeof(CustomShell), null);

    /// <summary>
    /// 選択されていないタブのタイトルの色を取得します。
    /// </summary>
    /// <param name="obj"></param>
    /// <returns></returns>
    public static Color GetTabBarUnselectedTitleColor(BindableObject obj) => (Color)obj.GetValue(TabBarUnselectedTitleColorProperty);

    /// <summary>
    /// 選択されていないタブのタイトルの色を設定します。
    /// </summary>
    public static void SetTabBarUnselectedTitleColor(BindableObject obj, Color value) => obj.SetValue(TabBarUnselectedTitleColorProperty, value);
}選択されたタブの背景色はCustomShell.TabBarSelectedBackgroundColorで、選択されていないタブのタイトルの色はCustomShell.TabBarUnselectedTitleColorになります。
実装方法(Android編)
Android部分の実装方法を説明します。
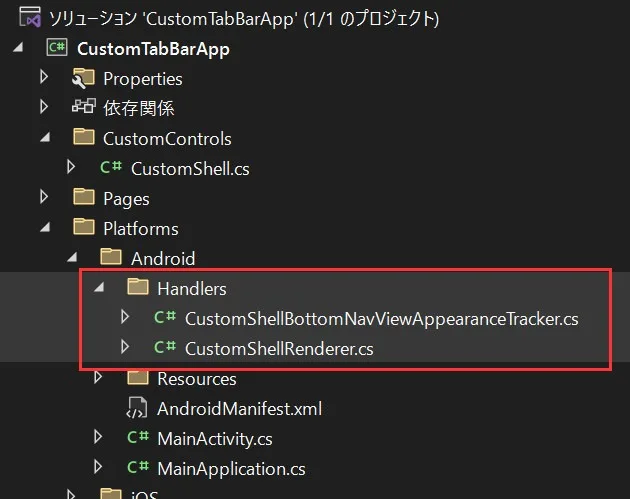
手順1:ファイルを準備します
以下のようにファイルを準備します。
手順2:ハンドラーをカスタムします
Shellのハンドラーをカスタムしていきます。
ShellRendererクラスをカスタムします
ShellのAndroidのハンドラーはShellRendererクラスになります。そのShellRendererクラスをカスタムするために継承していきます。実装した内容は以下のようになります。
using Microsoft.Maui.Controls.Handlers.Compatibility;
using Microsoft.Maui.Controls.Platform.Compatibility;

// 名前空間はソースに合わせてください。
namespace CustomTabBarApp.Platforms.Android.Handlers;

public class CustomShellRenderer : ShellRenderer
{
    protected override IShellBottomNavViewAppearanceTracker CreateBottomNavViewAppearanceTracker(ShellItem shellItem)
    {
        return new CustomShellBottomNavViewAppearanceTracker(this, shellItem);
    }
}Androidの下部タブはBottomNavigationViewで表現されています。BottomNavigationViewをカスタムするためにCreateBottomNavViewAppearanceTrackerメソッドを利用していきます。
ShellBottomNavViewAppearanceTrackerクラスをカスタムします
CreateBottomNavViewAppearanceTrackerメソッドで返却しているCustomShellBottomNavViewAppearanceTrackerクラスを作成していきます。
using Android.Graphics.Drawables;
using CustomTabBarApp.CustomControls;
using Google.Android.Material.BottomNavigation;
using Microsoft.Maui.Controls.Platform.Compatibility;
using Microsoft.Maui.Platform;
using AColor = Android.Graphics.Color;
using AShapeDrawable = Android.Graphics.Drawables.ShapeDrawable;

// 名前空間はソースに合わせてください。
namespace CustomTabBarApp.Platforms.Android.Handlers;

public class CustomShellBottomNavViewAppearanceTracker : ShellBottomNavViewAppearanceTracker
{
    private IShellContext _shellContext;

    public CustomShellBottomNavViewAppearanceTracker(IShellContext shellContext, ShellItem shellItem) : base(shellContext, shellItem)
    {
        _shellContext = shellContext;
    }

    public override void SetAppearance(BottomNavigationView bottomView, IShellAppearanceElement appearance)
    {
        base.SetAppearance(bottomView, appearance);

        SetTabBarSelectedBackgroundColor(bottomView);
        SetTabBarUnselectedTitleColor(bottomView, appearance);
    }

    /// <summary>
    /// 選択されたタブの背景色を設定します。
    /// </summary>
    /// <param name="bottomView"></param>
    private void SetTabBarSelectedBackgroundColor(BottomNavigationView bottomView)
    {
        Color? selectedBackgroundColor = CustomShell.GetTabBarSelectedBackgroundColor(_shellContext.Shell);
        if (selectedBackgroundColor is null) return;

        AnimatedStateListDrawable ItemBackgroundDrawable = new();
        AColor color = selectedBackgroundColor.ToPlatform();
        AShapeDrawable selectedDrawable = new();
        selectedDrawable.Paint?.SetARGB(color.A, color.R, color.G, color.B);
        ItemBackgroundDrawable.AddState([global::Android.Resource.Attribute.StateSelected], selectedDrawable);
        bottomView.ItemBackground = ItemBackgroundDrawable;
    }

    /// <summary>
    /// 選択されていないタブのタイトルの色を設定します。
    /// </summary>
    /// <param name="bottomView"></param>
    private void SetTabBarUnselectedTitleColor(BottomNavigationView bottomView, IShellAppearanceElement appearance)
    {
        Color? unselectedTitleColor = CustomShell.GetTabBarUnselectedTitleColor(_shellContext.Shell);
        if (unselectedTitleColor is null) return;

        Color titleColor = appearance.EffectiveTabBarTitleColor ?? appearance.EffectiveTabBarForegroundColor;
        Color unselectedColor = appearance.EffectiveTabBarUnselectedColor;
        bottomView.ItemTextColor = new(
            [
            [global::Android.Resource.Attribute.StateChecked],
            [-global::Android.Resource.Attribute.StateChecked],
            []
            ],
            [
                titleColor.ToPlatform(),
                unselectedTitleColor.ToPlatform(),
                unselectedColor.ToPlatform()
            ]);
    }
}
実装方法(iOS編)
iOS部分の実装方法を説明します。
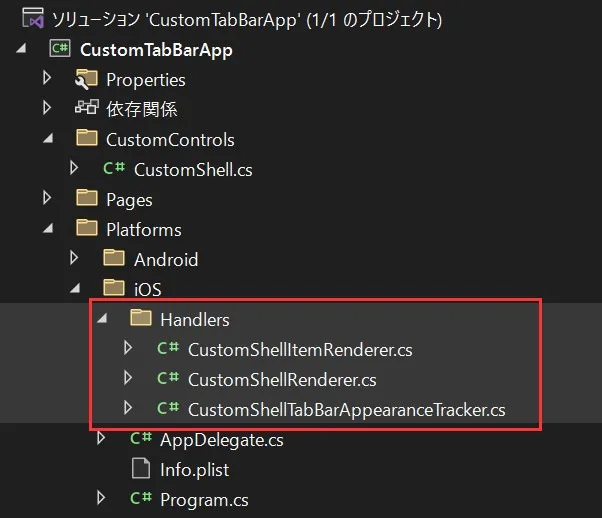
手順1:ファイルを準備します
以下のようにファイルを準備します。
手順2:ハンドラーをカスタムします
Shellのハンドラーをカスタムしていきます。
ShellRendererクラスをカスタムします
ShellのiOSのハンドラーはShellRendererクラスになります。そのShellRendererクラスをカスタムするために継承していきます。実装した内容は以下のようになります。
using Microsoft.Maui.Controls.Handlers.Compatibility;
using Microsoft.Maui.Controls.Platform.Compatibility;

// 名前空間はソースに合わせてください。
namespace CustomTabBarApp.Platforms.iOS.Handlers;

public class CustomShellRenderer : ShellRenderer
{
    protected override IShellItemRenderer CreateShellItemRenderer(ShellItem item)
    {
        return new CustomShellItemRenderer(this)
        {
            ShellItem = item
        };
    }

    protected override IShellTabBarAppearanceTracker CreateTabBarAppearanceTracker()
    {
        return new CustomShellTabBarAppearanceTracker(this);
    }
}TabBarはShellItemを継承しています。そのため、TabBarをカスタムするためにCreateShellItemRendererメソッドを利用していきます。
TabBarの色関係をカスタムするためにCreateTabBarAppearanceTrackerメソッドを利用していきます。
ShellItemRendererクラスをカスタムします
CreateShellItemRendererメソッドで返却しているCustomShellItemRendererクラスを作成していきます。CustomShellItemRendererクラスでは、選択されたタブの背景色を設定していきます。
using CoreGraphics;
using CustomTabBarApp.CustomControls;
using Microsoft.Maui.Controls.Platform.Compatibility;
using Microsoft.Maui.Platform;
using UIKit;

// 名前空間はソースに合わせてください。
namespace CustomTabBarApp.Platforms.iOS.Handlers;

public class CustomShellItemRenderer : ShellItemRenderer
{
    private IShellContext _shellContext;

    public CustomShellItemRenderer(IShellContext context) : base(context)
    {
        this._shellContext = context;
    }

    public override void ViewWillLayoutSubviews()
    {
        base.ViewWillLayoutSubviews();
        SetTabBarSelectedBackgroundColor();
    }

    /// <summary>
    /// 選択されたタブの背景色を設定します。
    /// </summary>
    private void SetTabBarSelectedBackgroundColor()
    {
        Color? selectedBackgroundColor = CustomShell.GetTabBarSelectedBackgroundColor(_shellContext.Shell);
        if (selectedBackgroundColor is null) return;
        TabBar.SelectionIndicatorImage = CreateSelectionIndicator(selectedBackgroundColor.ToPlatform());
    }

    private UIImage CreateSelectionIndicator(UIColor color)
    {
        CGSize size = new(this.TabBar.Frame.Size.Width / 3, this.TabBar.Frame.Size.Height);
        UIImage image = new UIGraphicsImageRenderer(size).CreateImage(g =>
        {
            color.SetFill();
            g.FillRect(new CGRect(new(0, 0), size));
        });
        return image;
    }
}
ShellTabBarAppearanceTrackerクラスをカスタムします
CreateTabBarAppearanceTrackerメソッドで返却しているCustomShellTabBarAppearanceTrackerクラスを作成していきます。CustomShellTabBarAppearanceTrackerクラスでは、選択されていないタブのタイトルの色を設定していきます。
using CustomTabBarApp.CustomControls;
using Microsoft.Maui.Controls.Platform.Compatibility;
using Microsoft.Maui.Platform;
using UIKit;

// 名前空間はソースに合わせてください。
namespace CustomTabBarApp.Platforms.iOS.Handlers;

public class CustomShellTabBarAppearanceTracker : ShellTabBarAppearanceTracker
{
    private IShellContext _shellContext;

    public CustomShellTabBarAppearanceTracker(IShellContext context)
    {
        this._shellContext = context;
    }

    public override void SetAppearance(UITabBarController controller, ShellAppearance appearance)
    {
        base.SetAppearance(controller, appearance);

        SetTabBarUnselectedTitleColor(controller, appearance);
    }

    /// <summary>
    /// 選択されていないタブのタイトルの色を設定します。
    /// </summary>
    /// <param name="controller"></param>
    private void SetTabBarUnselectedTitleColor(UITabBarController controller, IShellAppearanceElement appearance)
    {
        Color? unselectedTitleColorselectedBackgroundColor = CustomShell.GetTabBarUnselectedTitleColor(_shellContext.Shell);
        if (unselectedTitleColorselectedBackgroundColor is null) return;

        UIStringAttributes uIStringAttributes = new()
        {
            Font = controller.TabBar.StandardAppearance.StackedLayoutAppearance.Normal.TitleTextAttributes.Font,
            ForegroundColor = unselectedTitleColorselectedBackgroundColor.ToPlatform(),
            ParagraphStyle = NSParagraphStyle.Default
        };

        controller.TabBar.StandardAppearance.StackedLayoutAppearance.Normal.TitleTextAttributes = uIStringAttributes;
        controller.TabBar.StandardAppearance.CompactInlineLayoutAppearance.Normal.TitleTextAttributes = uIStringAttributes;
        controller.TabBar.StandardAppearance.InlineLayoutAppearance.Normal.TitleTextAttributes = uIStringAttributes;

        if (controller.TabBar.ScrollEdgeAppearance is not null)
        {
            controller.TabBar.ScrollEdgeAppearance.StackedLayoutAppearance.Normal.TitleTextAttributes = uIStringAttributes;
            controller.TabBar.ScrollEdgeAppearance.CompactInlineLayoutAppearance.Normal.TitleTextAttributes = uIStringAttributes;
            controller.TabBar.ScrollEdgeAppearance.InlineLayoutAppearance.Normal.TitleTextAttributes = uIStringAttributes;
        }
    }
}
実装方法(ハンドラーの登録)
カスタムしたハンドラー(CustomShellRenderer)を登録するため、MauiProgramクラスに以下のように実装します。
/* 追加します。======== */
#if ANDROID

// 名前空間はソースに合わせてください。
using CustomTabBarApp.Platforms.Android.Handlers;

#elif IOS

// 名前空間はソースに合わせてください。
using CustomTabBarApp.Platforms.iOS.Handlers;

#endif
/* ==================== */

// 名前空間はソースに合わせてください。
namespace CustomTabBarApp;

public static class MauiProgram
{
    public static MauiApp CreateMauiApp()
    {
        var builder = MauiApp.CreateBuilder();
        builder
            .UseMauiApp<App>();

        /* 追加します。======== */
        builder.ConfigureMauiHandlers((handlers) =>
         {
#if ANDROID || IOS
             handlers.AddHandler<Shell, CustomShellRenderer>();
#endif
         });
        /* ==================== */

        return builder.Build();
    }
}Android・iOSともにCustomShellRendererクラスにしているため、プラットフォームの切り分けにプリプロセッサ ディレクティブ(#if など)を利用しています。
利用例
利用してみた例は以下のようになります。controlプレフィックスにCustomShellクラスを用意した名前空間指定しています。
<?xml version="1.0" encoding="UTF-8" ?>
<Shell
    x:Class="CustomTabBarApp.AppShell"
    xmlns="http://schemas.microsoft.com/dotnet/2021/maui"
    xmlns:x="http://schemas.microsoft.com/winfx/2009/xaml"
    xmlns:page="clr-namespace:CustomTabBarApp.Pages"
    xmlns:control="clr-namespace:CustomTabBarApp.CustomControls"
    control:CustomShell.TabBarSelectedBackgroundColor="#5555ff"
    control:CustomShell.TabBarUnselectedTitleColor="#55ff55"
    Shell.FlyoutBehavior="Disabled"
    Title="CustomTabBarApp">
    <TabBar>
        <ShellContent Title="サンプル1" ContentTemplate="{DataTemplate page:SamplePage1}" Route="SamplePage1" Icon="samplepage1.png" />
        <ShellContent Title="サンプル2" ContentTemplate="{DataTemplate page:SamplePage2}" Route="SamplePage2" Icon="samplepage2.png" />
        <ShellContent Title="サンプル3" ContentTemplate="{DataTemplate page:SamplePage3}" Route="SamplePage3" Icon="samplepage3.png" />
    </TabBar>
</Shell>
動作イメージは以下のようになります。選択されたタブが青色に、選択されていないタブのタイトルの色が緑色になります。
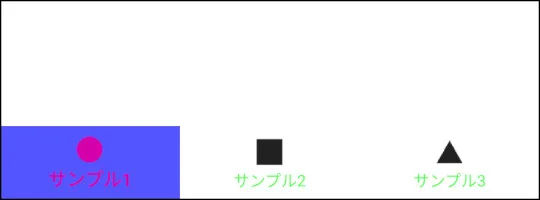
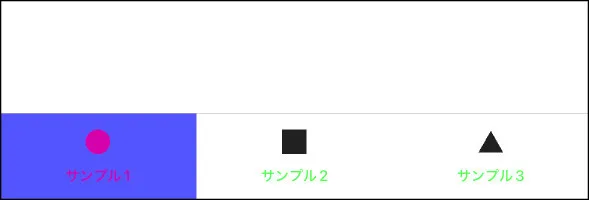
iOSの場合
未選択タブのタイトルを消すこともできる
選択されていないタブのタイトルの色を透明(Transparent)にすることで、選択されていないタブのタイトルを消すことができます。ただし、アイコンはタブの中央になりませんので気を付けてください。
<?xml version="1.0" encoding="UTF-8" ?>
<Shell ・・・
    control:CustomShell.TabBarUnselectedTitleColor="Transparent">
    ・・・
</Shell>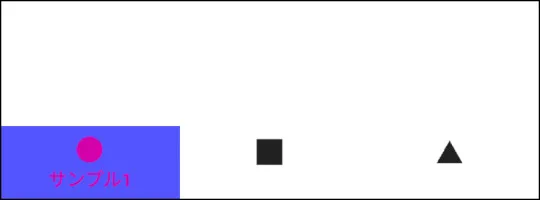
おわりに
既存のShellでは変更したい箇所の色が変更できないことがありましたので、今回の記事を作成してみました。選択されたタブの背景色は利用する場面が多いと思います。当記事の内容が役に立てば幸いです。